How to Install Hydraulic Brakes on a Mini Bike?
Putting stronger brakes on your mini bike can make riding safer. Switching from cable to fluid brakes is a big upgrade.
Hydraulic brakes use brake fluid in hoses instead of cables. This gives them more stopping power. It’s easier to control speed with hydraulics. But installing them takes work.
You’ll need parts like a brake caliper, rotor, and fluid lines. You must take off the old brakes and put the new caliper on. Then you bleed the fluid system. Last is testing the better brakes.
Conversion kits make the process easier. This article explains each step to convert a mini bike to disc brakes. We want our small rides to break fast and smooth!
Safety First
- Use jack stands. Lift the rear wheels safely to work.
- Wear eye protection. Brake fluid can damage eyes.
- Use nitrile gloves. Avoid brake fluid touching skin.
- Have rags ready. Immediately wipe up any spills.
- Check brake line clearance. Make sure lines won’t rub or kink.
- Do not drive without bleeding. Brakes won’t work with air bubbles.
- Test at low speeds at first. Make adjustments before going fast.
- Read all instructions. Follow manual steps closely.
The most important safety step is handling brake fluid carefully. Have rags and gloves ready at all times. Brake fluid deteriorates paint and other surfaces quickly. One little leak or spill can be damaging.
Take things slow by safety-checking at lower speeds after installing the new hydraulic brake system. And only drive once all air bubbles are fully bled!
Must-Have Parts & Tools
You’ll need to gather a few key components to perform the hydraulic brake upgrade:
- Hydraulic brake caliper – Choose quality brand designed for your bike’s disc size
- Brake rotor/disc – Match size (220mm, etc.) to caliper
- Brake lines – DOT approved stainless steel lines, cut to length
- Master cylinder reservoir – Supplies fluid to the brake lever
- Brake pads – Metallic compound pads grip better
- Caliper mounting bracket – May need fabrication or modification
In addition, have the following tools on hand:
- Basic metric wrench and socket set
- Allen key/hex wrench set
- Torx screwdriver set
- Adjustable crescent wrench
- Flare nut crowfoot wrenches – For brake line fittings
- Brake line bender – Makes neat brake line angles
- Brake bleeder kit – Pumps new fluid through system
Also ensure you have:
- DOT 3 or DOT 4 brake fluid
- Clean rags
- Eye protection
- Nitrile gloves
- Protective painter’s tape
- Thread locking fluid
Having all parts and tools prepared ahead of time will allow the installation process to go smoothly.
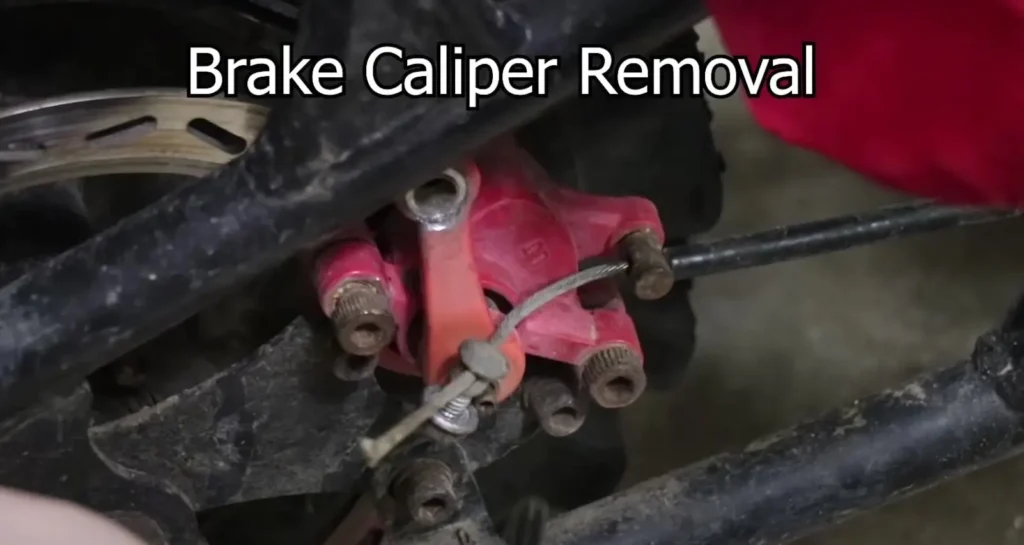
Removing the Existing Brakes
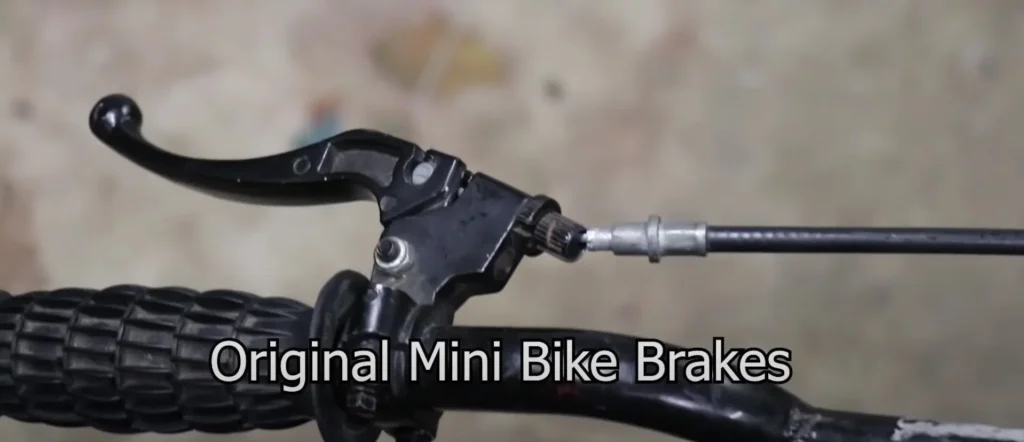
First, we need to fully remove the current brake system. Follow these steps:
- Use an Allen key to loosen the brake lever clamp. Slide lever off the handlebars.
- Cut any zip ties bundling brake cables to the frame.
- Disconnect the brake cable from the caliper under the seat.
- Use a 10mm socket wrench to remove the two caliper mounting bolts. Set aside components.
With old levers, cables, and calipers removed, the bike is prepped for the new hydraulic brake hardware.
Preparing the Mounts
The new brake caliper bracket will attach where the mechanical caliper was removed. But first:
- Test fit the hydraulic caliper, checking clearances. The brake line outlet and fluid reservoir need room.
- Using a die grinder, modify existing caliper mounts as needed to properly align the new caliper position.
- Drill new holes or weld on additional mount tabs if the stock mounts aren’t compatible.
Take dimensions directly from your replacement caliper for ideal alignment.
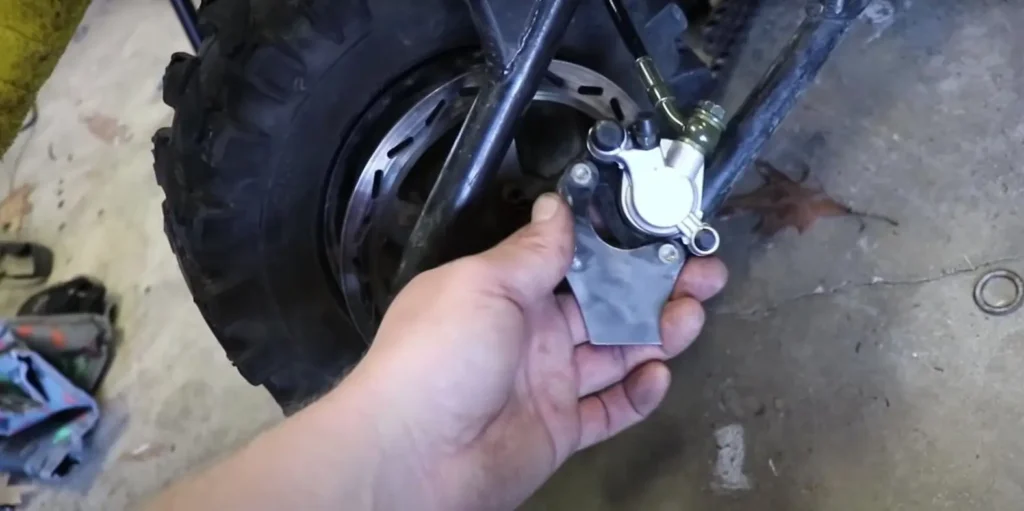
Installing the New Caliper
Once mounts are prepped, bolt on the hydraulic brake hardware:
- Bolt caliper bracket into place, using spacers if needed to align with the rotor disc.
- Attach caliper onto mounts using thread locker. Rotate the center brake pads over the disc.
- Connect the supplied brake line to the caliper inlet port using a line wrench. Route line avoiding contact with wheels or frame.
- Fill the master cylinder reservoir with DOT brake fluid. Bleed the system.
Bleeding the System
Bleeding is crucial to swap all air out of the hydraulic lines with fluid for functional brakes:
- Attach a clear bleeder hose to the caliper bleed nipple, routing hose end into a catch bottle.
- Open the nipple while the partner slowly pumps the brake lever to flow old fluid and air bubbles out.
- Close nipple when fluid runs clear with no bubbles. Refill reservoir as needed.
- Repeat process for both front and rear brake systems if converting both.
Testing and Final Adjustments
Before riding, safely test brake operation:
- With rear wheel lifted, spin wheel while operating brake lever to check caliper clamping functionality.
- Make small speed-run-ups while activating brakes to test initial power.
- If brakes feel squishy, repeat the bleed process to remove any remaining air pockets.
- Adjust caliper alignments and brake pad contact as needed to center force on rotor disc face.
Follow these tips and you’ll be shredding pavement in no time with fresh, high-powered hydraulic brakes!
Caring For Your Hydraulic Brakes
To keep your new disc brakes working smoothly:
Bed in the brake pads
- New pads need proper break-in to transfer material onto rotors and prevent glazing.
- Accelerate to speed then come to a steady, gradual stop 20-30 times. Avoid sudden stops.
Flush brake fluids regularly
- Fluids absorb moisture over time which causes component corrosion.
- Every 1-2 years, drain systems fully and bleed in new, fresh DOT brake fluid.
Upgrade brake pads and rotors
- As pads and rotors wear down from friction, stopping power reduces.
- Switch to performance metallic or ceramic brake pads for improved bite and heat resistance.
- Step up to drilled, slotted, or dual-piston floating brake rotors for even more effective heat dissipation under hard braking.
Based on my experience, staying on top of bleeding maintenance and upgrading to high-temp brake pads makes a big difference in getting the most out of your brake system upgrades.
FAQs/Troubleshooting
Q: Why does my brake lever feel spongy or soft after installing hydraulic brakes?
Air is still trapped in the hydraulic system. Re-bleed lines and ensure fluid reservoir is topped off.
Q: What causes the brakes to squeal, shudder or vibrate when stopping?
Pads glazed over. Follow proper break-in procedure to transfer pad material to rotors.
Q: Why do my wheels lock up when I apply the hydraulic brakes?
Caliper alignment is off-center. Reset caliper position to evenly contact rotor face when clamping.
Q: I removed the axle bolts but can’t get the wheel off – what should I try?
Threads may be corroded. Use penetrating lubricant and let soak 15 minutes before gently hitting the axle end with a mallet.
Q: The brake pedal drops to the floor when applied – what could cause this?
Leak in hydraulic lines allowing air back in. Tighten fittings and seal lines. Refill fluids.
Q: I spilled some brake fluid on my bike’s painted surface – how do I clean or repair the paint damage?
Immediately soak up fluid spill with rags. Wipe area down with isopropyl alcohol as soon as possible to avoid permanent damage.
Wrapping Up Your Brake Upgrade
Converting your mini bike from mechanical to hydraulic brakes is an involved but very rewarding upgrade. With enhanced stopping abilities, you can ride faster with confidence.
We covered a lot of ground! To recap, the critical steps are:
- Removing old brake components
- Preparing suitable caliper mounts
- Installation and alignment of the new hydraulic brake caliper
- Bleeding air bubbles out of the brake fluid system
- Testing at safe speeds and making adjustments
- Maintaining the hydraulics with fluid changes
Don’t forget essential safety checks before really putting the power of your new brakes to the test!
Final Safety Checks:
- Ensure brake lines have no leaks and are secured from rubbing
- Confirm brake pads contact rotor cleanly without shuddering
- Verify brake force feels firm and consistent in lever pull
- Slowly accelerate and brake multiple times, gradually increasing speed
- Carefully check all bolts and mounts to confirm everything is tight
- Adjust alignments and torque settings as needed
Then go shred some blacktop on your mini ride! And remember, over-maintaining your hydraulics means reliable brakes you can count on when you need to stop. Slow down and stay safe!
How’s that for circling back on the critical steps and must-do safety checks?