How To Put Lights on a Mini Bike?
Choose bright LED headlights and taillights made for motorcycles. Mount them securely using existing or custom brackets. Connect the lights to a 12V battery using waterproof switches and fuses. Test all lighting before riding at night for proper visibility and safety.
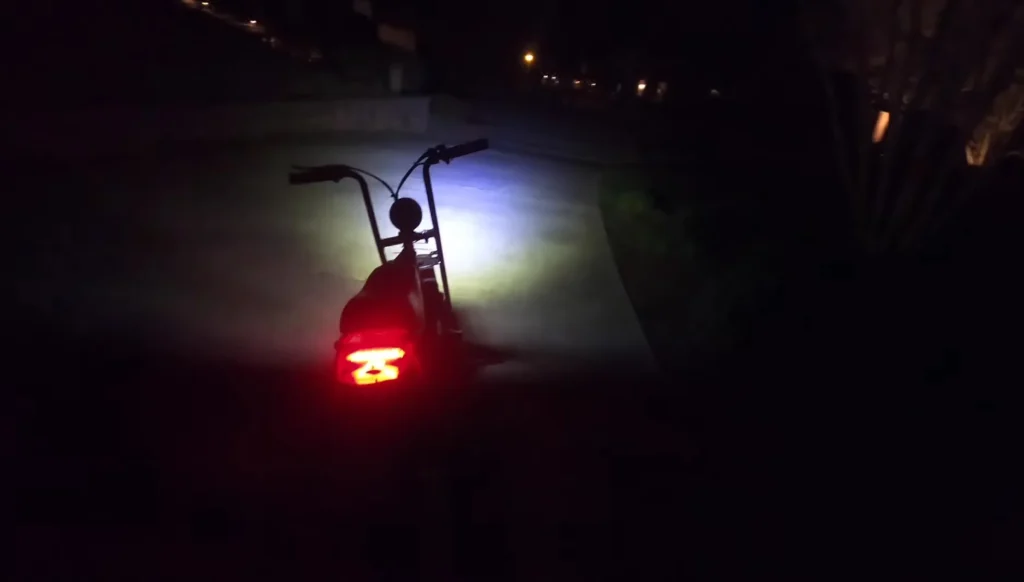
Imagine cruising down backroads or wooded trails as the sun sets, the beams of your mini bike’s LED headlight illuminating the path ahead. As darkness falls, you flick on the custom taillight and under glow lights you installed yourself.
A whole new world of adventure opens up for night rides on your tricked-out mini bike! But quality lighting is crucial. In this guide, I’ll share my expertise on illuminating your mini bike for safe, thrilling after-dark rides.
Choose High-Quality LED Lights
For mini bike lighting, I recommend selecting:
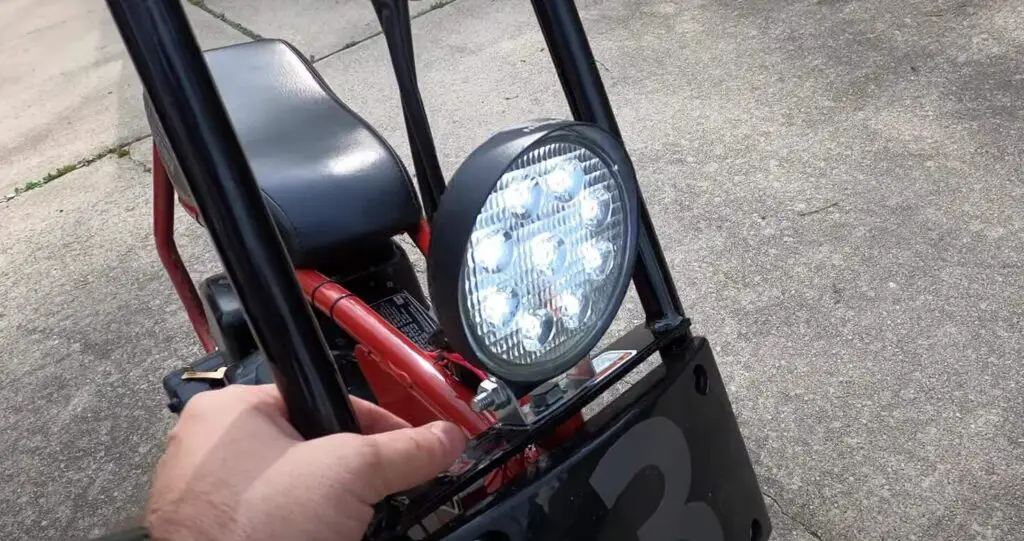
- Small LED pod lights for the headlight. I use a 4-inch LED pod with a focused beam to illuminate ahead.
- Bright red LED tail lights made for motorcycles for optimal visibility. Integrate brake lighting for added safety.
While flashy lighting looks cool, ensuring legality and riding cautiously when sharing roads is key. As Adam Smith from Street Rider of Reno, veteran mini bike repair technician with 20 years experience advises, “LED lights are usually the best option for mini bikes these days.
They are very energy efficient, provide good illumination, and last a long time.” Quality LEDs allow safe night riding by producing bright light without overtaxing the electrical system.
Mount Lights Securely
Proper mounting maximizes durability and visibility:
- Attach headlight pods to existing mounts like the front number plate.
- Mount taillights using rear fender or frame brackets.
- Fabricate custom brackets if needed.
- Adjust angles so headlight points forward and taillight faces backward.
- Neatly route and fasten wiring using ties or clips.
Power Your Lighting System
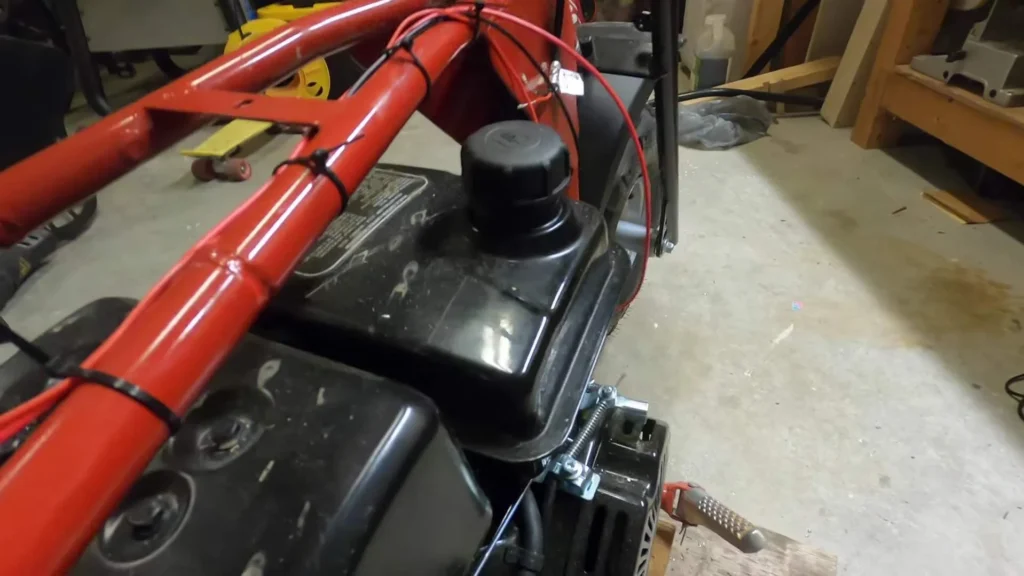
For power, use a 12V rechargeable battery, like a motorcycle battery, mounted securely on the frame or under the seat. As Smith explained, “To ensure the lights get enough consistent power, you may need to upgrade the stator and magneto on the mini bike’s engine.
This will help produce more usable current to run accessories like lighting.” Recharge the battery after every ride to keep the system powered for optimal illumination.
For wiring, connect lights directly to the battery using waterproof switches and fuses. Quality wiring ensures bright lighting all night.
Test Lighting Before Your First Night Ride
Thoroughly test all lighting before riding at night:
- Verify headlight, taillight and accessories function properly.
- Check connections are secure.
- Bring fully charged spare batteries for long rides.
- Follow laws and ride cautiously, especially on public roads.
With proper LED lighting installed and tested, get ready to ride into the night! Add lights to maximize visibility and safety after dark. With my tips, your mini bike will shine bright for thrilling night adventures.
Know Your Local Laws
While lighting improves visibility, mini bikes themselves may not be street legal. Requirements vary significantly across regions.
- Check municipal codes to understand laws in your area regarding mini bike operation and registration.
- Even if permitted on certain roads, take precautions like wearing a helmet and avoiding main roads when possible.
- Ride wisely and courteously to preserve community access.
- Never assume lights alone make your mini bike street legal. Additional equipment like mirrors or a horn may be mandated.
For registration and operation requirements in your region, consult your local DMV. Ride safely and legally!
Install Mini Bike Lighting in 5 Key Steps
Adding lights unlocks thrilling night riding. Follow these main steps to maximize visibility and safety:
1. Choose Quality LED Headlights and Taillights
- Select lights designed specifically for motorcycles or bikes.
- Headlight should have a focused beam.
- Tail Light needs wide rear visibility.
2. Mount Lights Using Secure Brackets
- Attach to existing mounts or fabricate custom brackets.
- Adjust angles properly.
- Neatly fasten wiring.
3. Wire to 12V Rechargeable Battery
- Connect lights directly using waterproof switches and fuses.
- Ensure reliable power source and bright lighting.
4. Test Lighting Before First Night Ride
- Verify all lighting functions properly.
- Check connections are secure.
- Have spare charged batteries available.
5. Ride Cautiously Following Laws
- Be aware of and follow lighting laws and mini bike operation rules.
- Take precautions even if it’s legal, like wearing a helmet.
- Be a responsible, courteous rider.
Get ready to cruise into the darkness on your illuminated mini bike! Add lighting for safe and exciting night time adventures.

Jim Korey is the obsessed founder of MasterBikez, bringing over 20 years of experience as a mini bike enthusiast, former semi-pro stunt racer, and custom mini bike builder.
He’s author of the best selling book “Riding Small, Living Large” where Jim draws from his outrageous adventures and extensive hands-on knowledge to provide fellow riders with entertaining stories and wizard-level tips. His wealth of mini bike passion empowers the MasterBikez community.