
How To Replace Clutch on Mini Bike?
Replacing a worn clutch on a mini bike involves gathering the proper replacement parts and tools, disassembling to remove the old clutch, cleaning and inspecting components, installing the new clutch, adjusting cable tension, verifying operation, and performing preventative maintenance. Carefully following the clutch replacement steps and procedures will get your mini bike shifting smoothly again.
Nothing kills the thrill of a mini bike ride faster than a slipping clutch. As an avid dirt bike rider, I’ve had my share of clutch issues over the years. But the good news is that replacing a worn out clutch is a totally doable DIY repair.
With some basic tools and these steps, you can remove and install a fresh new clutch to get your mini bike shifting smoothly again in no time.
My Story of Clutch Woe
I’ll never forget the heart-sinking feeling when my tricked-out Coleman BT200x’s clutch started slipping badly midway through an epic trail ride. There I was, winding through the woods, when I twisted the throttle to climb a steep hill and the engine screamed but the bike barely crept forward. That sickening clutch slip meant my day of dirt shredding was over.
After limping back home, I knew replacing the fried clutch was my only option to hit the trails again. Thankfully, the repair was easier than expected. With a Haynes manual, some hand tools, and a Saturday afternoon, I had that mini bike ripping through the hills again. The feeling of crisp acceleration after the fix was a sweet success.
Key Takeaways
- Know the signs of clutch failure
- Confirm the clutch is the problem before starting
- Gather the correct tools and replacement parts
- Follow proper steps to remove and disassemble the clutch
- Thoroughly clean and inspect components
- Carefully install the new clutch and adjust
- Reassemble using proper procedures
- Maintain the clutch to maximize lifespan
Know the Signs Your Clutch Needs Replacement
- Slipping under acceleration
- Failure to fully disengage when pulled
- Abnormal noises from clutch area
- Difficulty shifting gears
As Adam Smith from Street Rider of Reno, veteran mini bike repair technician with 20 years experience advises, “Catching these common clutch failure symptoms early is key since a worn clutch will only get worse if not addressed quickly.”
Once you notice these signs, be proactive in replacing damaged parts before small issues lead to costly repairs. Don’t wait for routine maintenance if you spot problems. Swap in new clutch components at the first signs of trouble.
Be Sure It’s Actually the Clutch

Before tearing into the clutch, verify it’s the true culprit. Check for:
- Leaking fluid near clutch cover
- Burnt smell from clutch
- Abnormal grinding noises
- Difficulty shifting gears
Noticing any of those? Time to inspect the clutch and likely replace worn parts. Catch problems early to prevent pricier repairs later.
Get the Proper Gear
Gather the right stuff before starting:
- Clutch kit – plates, springs, etc. for your model
- Basic mechanic’s tools – wrenches, sockets, allen keys, etc.
- Cleaning solvent – brake cleaner works great
- Rags, lubricant, puller tool – don’t forget ‘em!
Having the exact tools and parts makes the job so much smoother. Trust me, nothing’s worse than stopping mid-repair because you’re missing something!
Removing the Old Clutch
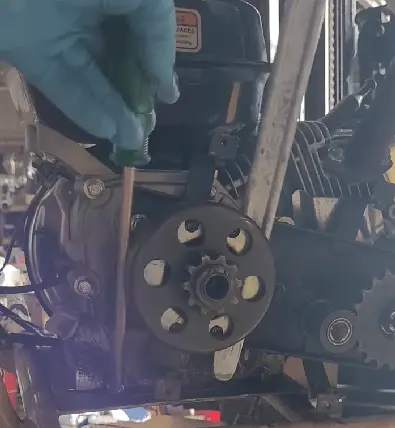
Follow these steps to properly remove your worn clutch:
Prep Steps
- Remove clutch cover
- Detach drive chain
- Wedge screwdriver in spark plug hole to immobilize crankshaft
Loosen and Remove Clutch Bolt
- Use proper size wrench to loosen bolt
- Once loose, remove bolt fully
Extract Clutch Assembly
- Use puller tool to evenly pull clutch off
- Carefully tap loose with screwdriver as alternate method
Key Points:
- Prevent crankshaft from spinning
- Completely loosen clutch bolt first
- Use puller tool or hammer/screwdriver method
- Avoid damaging clutch plates
Clean and Inspect the Clutch
- Disassemble plates/springs if needed to access friction surfaces
- Use brake/carb cleaner and rags to remove all debris
- Inspect plates, springs, basket teeth closely for wear/damage
- Replace any damaged parts
Thorough inspection catches issues needing fixing before reassembly. Don’t skip this step!
Install the Fresh Clutch
- Lightly oil crankshaft splines
- Install new clutch properly aligned
- Use blue Loctite on clutch bolt
- Adjust cable tension
Take your time ensuring proper alignment and tension. Rushing this risks problems down the road.
Reassemble and Test Thoroughly
- Reconnect drive chain and clutch cover
- Verify clutch operation before riding
- Carefully reassembling components and testing engagement prevents issues later on.
According to Adam Smith, a typical clutch replacement takes 1-2 hours with some mechanical experience. He advises having the proper tools on hand and using a clutch puller tool to save time versus splitting cases.
Smith also recommends having an assistant for clutch basket removal/install and taking photos during disassembly to aid reassembly. Following these tips will help the job go smoothly and quickly.
Keep Up with Maintenance
- Lubricate clutch cable
- Re-grease clutch parts
- Adjust cable as needed
- Inspect clutch at least once per season
According to Adam Smith, the clutch on a regularly ridden mini bike should be replaced every 1-2 seasons. For competitive riding, plan yearly replacement.
Proper lever adjustment and avoiding overheat extend clutch lifespan 2-3 seasons with recreational use. Staying on top of maintenance helps maximize clutch performance and durability.
Conclusion
Replacing your mini bike clutch restores smooth shifting and acceleration after wear and tear ruins your riding fun. While it may seem daunting, this repair is very doable for a mechanically-inclined DIYer.
The key is identifying clutch problems early on and addressing them promptly before small issues lead to costly repairs. Equip yourself with the proper tools and knowledge ahead of time to ensure success.
Take the time to clean and inspect components thoroughly. And don’t skip preventative maintenance steps to maximize your new clutch’s lifespan.
With some patience and the right techniques, you can have your mini bike running like new again in no time. So get your tools ready and get wrenching – those trails are calling!