How to Make a Mini Bike Clutch?
Crafting a high-performing manual mini bike clutch requires meticulously machining parts like the basket, drum, plates, and lever. Then properly assemble the components with dialed spring rates, disc packs, and cable routing for optimal engagement control.
Picking between a centrifugal clutch or manual clutch matters when you build a fast mini bike. Talking with top mini bike gearheads can help decide.
- The centrifugal clutch locks the back sprocket based only on engine speed. As RPMs increase, weights inside the bell move out fast. This makes clutch plates press the drum.
- Centrifugal clutches are:
- Easy to use
- Low cost
- Engage smooth
- But centrifugal clutches have no tuning adjustments. And they can’t control hard launches off the line.
The manual clutch uses a lever, cable, springs and plates. This gives complete control over clutching by hand.
- Manual clutches are:
- Tunable
- Allow fast launches
- Can use engine brake
- Yet more complex than the centrifugal kind.
This piece teaches building a top manual clutch for your mini. Whether wanting a certain engagement speed, max power transfer, or hard control from launch – the manual clutch wins.
Sections will cover:
- Needed parts
- Build steps
- Tuning it
With this expert guide, your custom manual mini bike clutch will crush store versions.
Key Takeaways
- Manual clutches allow complete control over engagement versus automatic centrifugal clutches
- Essential parts include clutch components like drums, friction discs, springs, cable/lever
- Must have metalworking tools and shop consumables prior to starting fabrication
- Meticulous design, machining, heat treating, and assembly steps required
- Tuning engagement rpm and torque capacity vital based on engine and bike purpose
- Regular inspection, preventative maintenance, and tuning clutch engagement critical
- Properly building and maintaining a manual clutch enables awesome launches and power transfer
- Reaching out for guidance from the author on any fabrication or upkeep questions welcomed
Components Needed
When making a custom mini bike manual clutch, having the right parts, tools, and shop supplies is key. Below lists everything required before starting:
Essential Parts
- Clutch hub
- Clutch sprocket
- Clutch drum
- Friction discs and steel discs
- Clutch springs
- Clutch basket
- Clutch cable and perch
- Clutch lever
- Bearings
- Spacers
- Bolts

Tools You’ll Need
Welder
- Lathe
- Mill
- Drill press
- Bench grinder
- Arbor press
- Air compressor
- Hand tools
- Calipers
Shop Supplies
- Steel stock
- Aluminum stock
- Lubricants
- Fasteners
- Rubber
- Solvents
- Cutting tools
- Rags
- Eye protection
Having all those clutch parts on hand, the right metalworking tools, and necessary shop consumables lays the foundation.
The next section explores the step-by-step approach to machining and fabricating each individual component.
Be sure to acquire quality materials and tools – do not cut corners. Your added investment transforms into improved clutch longevity and bike performance.
Building the Manual Clutch Step-by-Step
Crafting a high-performance manual mini bike clutch requires methodical fabrication across these key areas:
Design Prep
- I recommend first determining intended bike usage (top speed, wheelies, racing, etc.) to establish build goals
- Then map the required RPM engagement range and torque capacity targets
- It is best to sketch concepts and properly size components
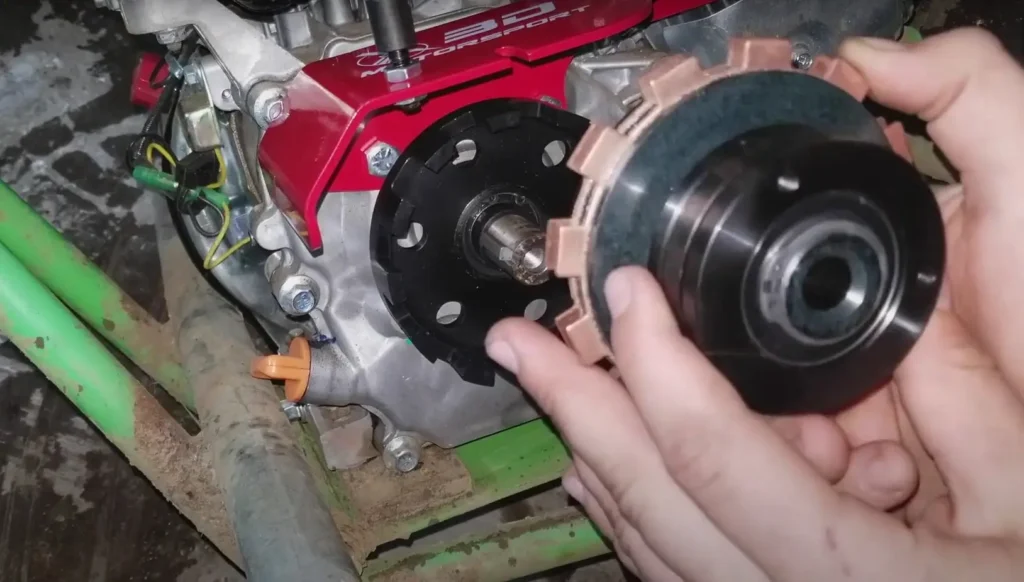
Machining the Drum and Basket Housing
- Be sure to face mill clutch basket housing sides square and parallel
- Carefully turn clutch drum diameter to achieve 1mm friction disc clearance
- Precisely bore drum and basket ID to fit output shaft and bearings
- Cut splines or surfaces to locate friction discs
Fabricating Discs and Springs
- Accurately cut steel discs to fit drum splines
- Machine friction discs from brake rotor blanks
- Grind discs flat and parallel to 0.001”
- Set spring free length based on torque calculations
- Properly heat treat springs and steel components
Pre-Assembly
- Polish drum, disc, and hub contact surfaces
- Lubricate components with high temp grease
- Test fit parts for proper clearances
- Confirm lever perch alignment
Final Assembly
- Set spring compressed heights via custom tooling
- Stack disc packs based on selected tuning
- Torque fasteners to recommended specs
- Connect clutch cable and adjust lever
- Safety wire bolts and inspect finishes
The following section covers proper break-in, tuning, and maintenance procedures once the clutch build is complete.
Caring for Your Custom Manual Clutch
Properly maintaining a hand-built mini bike manual clutch ensures exceptional performance and longevity. Follow these expert tips:
Inspection Procedures
- Monthly, check for loose bolts and fix if found
- Examine friction discs every 3 months for tearing, cracks, or grease
- Confirm cable and lever smoothness in operation
Preventative Steps
- Lubricate clutch components with high temp disc brake grease
- Safety wire or torque stripe critical fasteners
- Avoid excessive throttle blips while clutch is engaged
Replacement Recommendations
- Friction discs usually need replacement yearly depending on use
- Heat discoloration of springs signals need to replace
- Swap bushings, bearings every 2-3 years as preventative
Tuning Engagement RPM
- Utilize progressive clutch spring rates to fine tune engagement
- Gear sprocket sizes appropriately for intended power band
- Account for chain elongation over time when setting
Diagnosing Issues
- If clutch slips under power – address friction disc wear or spring fatigue
- Cable sticking indicates damaged housing or dirty cable/lever joints
Proactively addressing wear, adjusting engagement speed appropriately, and rectifying problems swiftly reduces risk of more significant failures down the road. Your custom clutch will reward such care with unparalleled feel and hookup.
Wrapping Up
This piece shared key points on making your own top mini bike manual clutch. Taking time to fabricate and care for it properly lets unmatched life and control.
Rushing build steps risks low friction material bonding, poor heat treating, or sloppy tolerated fits causing chatter. Lazy maintenance also destroys clutch lifespan and damages bikes.
Yet doing it right rewards awesome launches, powerband fit, and service years.
I suggest sticking to the expert part selection, machine, and upkeep tips here. This dedication unlocks great mastery over your mini ride’s performance and contest wins.
Have more fabrication or maintenance questions? Feel free to contact me. Happy to lend a hand!