How to Engine Swap a Mini Bike?
Mini bikes pack little engines. Their 50-100cc mills deliver speeds of 30-45mph typically. This range suits puttering. It does not satisfy racers. Swappers can transform their bike’s power by upgrading its motor.
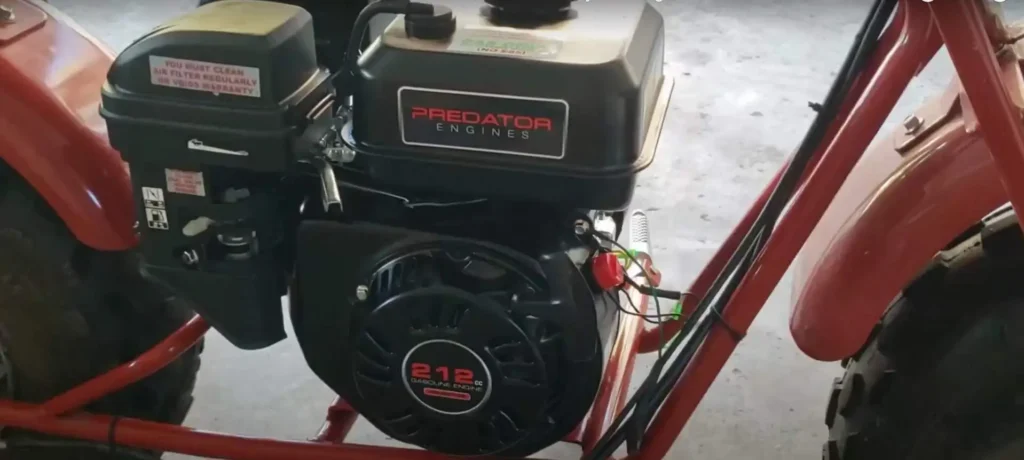
The small stocks found in most mini bikes lack true torque and horses. While fine for quiet riding, their output leaves lots to be desired on trails and tracks. Luckily, bolting bigger motors like the ever-popular 212cc Predator yields giant performance gains.
Swapping the factory engine for an upgraded model carries some key benefits:
- More Displacement + Horses – Jumping from a 50-100cc to a 200cc+ motor dramatically lifts speed and power skills. You’ll add serious torque and acceleration.
- Better Performance – Bigger engines make once-laggy mini bikes completely thrilling, attacking trails and even wheeling. This mod unlocks the bike’s full talents.
- Higher Top Speeds – Stock 30-45 mph mini bikes become 60+ mph machines, moving closer to small motorcycles vs glorified toys.
- Customization Doors Open – An engine swap starts the path for future mods like intake, exhaust, tuning – the works!
While this upgrade adds complexity, engine swapping gives power and customization that makes the effort worthwhile.
Key Takeaways
- Upgrading to a bigger 200cc+ engine dramatically increases power, torque, top speed (from 30-45 mph to 60+mph), and performance potential
- The Predator 212cc engine is a popular, affordable ($100) choice, but other options like clone engines, 110cc/125cc motors, or used motorcycle engines work too
- Test fit the new engine to check clearances, mounting points, alignment, oil capacity etc. before installing
- Remove body plastics first for access, drain fluids to reduce spills, then detach throttle cables, electrics, fuel lines before lifting out old engine
- You may need to trim plastics, fabricate spacers/plates, tweak alignments to fit the new larger engine
- Reconnect all controls and safety check (torque, leaks, kill switch, oil) before restarting
- Tuning the carburetor and break-in period are critical before riding
- Gearing changes, suspension upgrades, intake/exhaust mods can further customize performance after swap
- Expect way more power and speed (transforms 30-45 mph putter into 60+ mph thrill ride), kicks off future customization, but requires technical skill
Planning Your Swap
Selecting a New Engine
When planning your mini bike engine swap, the first decision involves picking your new powerplant. The most popular choice is the Predator 212cc engine, a 6.5 horsepower model commonly starting around $100. Based on hands-on experience, its affordable price and abundant performance mods make it hard to beat.
However, a few other options exist too:
- Clone Engines: Aftermarket copies of Honda’s GX200, often imported from China. Similar specs to the Predator but may lack support.
- 110cc/125cc Engines: Beefier 4-stroke engines lifting the power beyond a stock 50cc without breaking budgets.
- Motorcycle/Scooter Engines: A used 80-100cc engine from a bike, atv, or scooter keeps costs low while increasing displacement. Finding one with a mounting that fits takes effort though.
Engine Spec Considerations
After selecting a replacement engine, take stock of key specifications to determine if it meets your needs and fits the frame:
- Displacement/CCs: Horsepower, torque, acceleration and top speeds rise rapidly above 100cc levels.
- Horsepower and Torque Numbers: More is better for strong launches and high speeds. 6.5hp is great; 4hp still dramatically exceeds a 50cc.
- Overall Dimensions: Will it physically fit, or will plastic trimming become necessary? Air filters and valve covers often run into interference problems when engine swapping.
- Mounting Holes and Hardware: Do the mounting holes line up? Check well or prepare to drill new ones and cobble together suitable hardware.
- Oil Capacity and Features: Don’t run a bigger engine too lean on oil. And note whether it has an external tank or internal crankcase reservoir.
Essential Parts and Tools Checklist
Alongside your new engine, gather the vital components and garage tools:
- New Throttle Cable or Throttle Extension
- Stronger Chain, Reusable Sprockets
- Motor Mount Bolts/Hardware
- Wrench and Socket Sets
- Pliers and Cable Cutters
- Power Drill with Assorted Bits
- Grinder to Notch Frames and Trim Plastics
- Crescent Wrenches as Backup
With the right engine secured and parts on hand, transforming your mini bike grows more feasible. But the planning doesn’t halt here – continual adjustments still take place when physically conducting the swap.
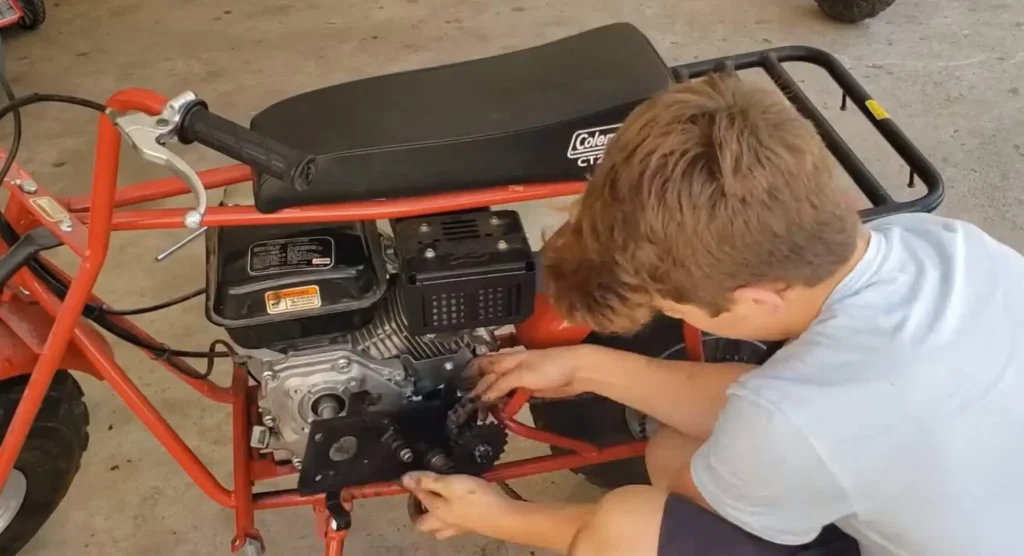
Removing the Stock Engine
Drain Fuel and Disconnect Power
Before tearing into the mechanicals, some preparatory steps allow cleaner disassembly:
- Drain the gas tank fully, allowing the carburetor bowl to completely run dry too. This prevents potential fuel spills and mitigates fire risk.
- Disconnect the negative battery terminal if equipped. Removing this connection hinders dangerous sparks, shocks or an accidental electric start.
- Place cardboard underneath the mini bike to contain any oily drips once components loosen. Avoid lighting sparks or flames near lingering gas vapors!
Imagine yourself powered down, drained of fluids, and ready to dig in safely.
Remove Body Plastics for Access
Taking off the mini bike’s external plastic shields grants the needed access when engine swapping:
- Side panels
- Front fender
- Any accessory pieces blocking wrench or hand clearance
Beware applying too much prying force and fracturing the plastics. Expect scuffs if assuming unnatural angles. If fastener stubbornness strikes:
- First, apply penetrating oil and allow time to work.
- Next, gently increase leverage via screwdrivers or pry tools. Avoid sudden force.
Envision how free space liberates future motion and eases the upgrade.
Loosen Mounts and Disable Drive
Start loosening every engine mount bolt securing the factory powerplant. Surprisingly, this process leaves best saved for after draining fluids! With less gas to leak out, gravity keeps more oil contained.
Pop the small metal clip linking the chain together too, detaching the drive system. Then adjust the tensioner to its loosest setting. This allows the needed swingarm flex soon to separate the engine and wheel.
You’ll soon feel the freedom of a loosely-hanging mill.
Detach Throttles, Electrics and Fuel Lines
Next, the handlebar controls disconnect:
- First, marking wire terminal positions facilitates reassembly later
- Unbolt the carburetor’s throttle cable and any kill switch leads
- Finally, the fuel supply line detaches once the carburetor unmounts
- Have an oil pan or splash rag handy – gas drips inevitably sneak out
Envision the last connections freely dangling away from the engine.
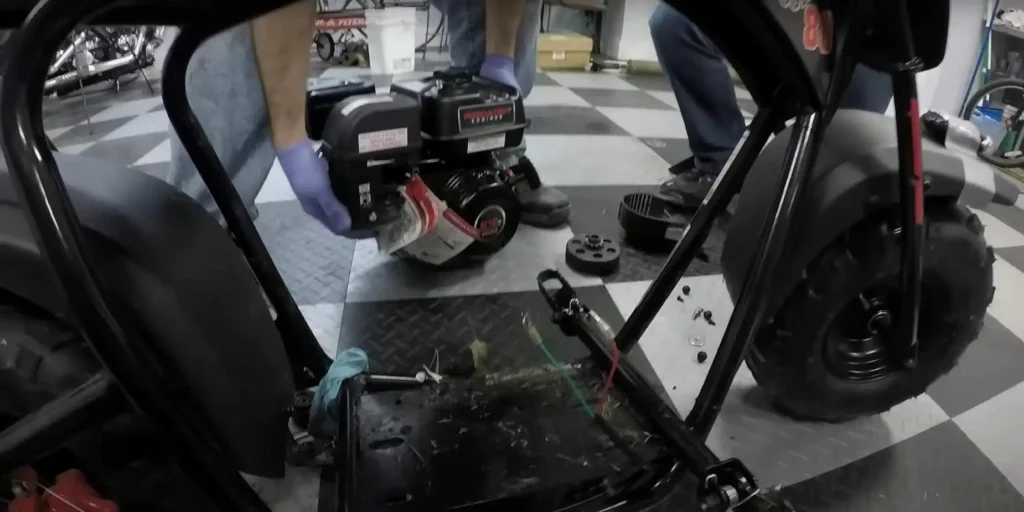
Lift Out the Factory Power Plant
With all bolts loosened and linkages detached, the OEM engine should lift out with light prying. Gravity sometimes needs a bit of coaxing via flathead screwdrivers under the case. Work patiently to protect the metal surfaces.
Once released, quickly note any shims or spacers behind the mill. Their thickness and locations often prove important when reinstalling the beefier engine.
Carefully place the greasy, spent stock powerplant aside. Take pride in completing the grunt work; easier jobs lie ahead!
Installing the new engine
Test Fit the Engine
With the mini bike now an empty frame, it temporarily fit the shiny new engine into the space vacated by old mill. This test fitting allows you to assess:
- Physical clearances – Will the larger block physically fit inside the frame triangle and plastics without binding or rubbing? Watch valve covers and air filter positions especially.
- Mounting holes – Do the updated engine’s mounting holes align with the stock pattern? If not, marking new stud points for drilling occurs next.
- Chain/sprocket alignment – Verify the crank sprocket lines up with the swingarm’s rear wheel cog when seated. Misalignments mean jackshaft adjustments.
Mentally mock up needed mods and component positioning shifts before proceeding.
Adjusting and Test Fitting Again
After the initial dry run, determine what needs altering or reconfiguring to make the swap work. Common adjustments include:
- Trimming plastics if rubbing occurs – Don’t be shy with the rotary tool!
- Fabricating new spacers and hardware – Sometimes old and new mate via handcrafted mounting plates. Improvise!
- Alignment tweaks through slide hammer persuasion – Metal gives way under enough ply pressure. Be strategic with strikes to land alignment.
With the puzzle pieces now properly modified and positioned, reinsert the engine to reconfirm fitment prior to final mounting.
Drill New Mounting Holes
If the new engine lacks identical mounting stud patterns, break out the power drill and bit assortment next. With the test-fitting complete and engine block removed once more:
- Mark new hole locations based on precise measurements
- Start small with pilot holes before using larger bits
- Examine both block sides to mark symmetrically
- Holes must align perfectly to avoid cracked cases
Use a voice recorder describing the fabrication story unfolding for later playback smiles.
Bolt in the Engine
With precisely aligned new mounting holes drilled, the exciting moment for mating engine and frame arrives through reinsertion and draw-down.
- Rotate crank slowly, feeling for any binding spots still
- Triple check sprocket-to-sprocket parallelism
- Insert bolts with washers to avoid cracking cases
- Gradually tighten mounts to specified torque values
Before fully wrenching down, imagine yourself basking in the glory of the first engine turnover attempt soon approaching…
Reconnect Controls
With all mount bolts torqued, pivot back to re-connecting the dangling control linkages:
- Throttle cables must link carb precisely to throttle tube
- The tensioned drive chain reattaches via master link
- Kill switches and electric terminals reconnect one-for-one
- Inspect fuel lines for cracks and ensure a sealed carb union
Take pride in a tidy handlebar control restoration reflecting precision craftsmanship.
Startup and testing after the engine swap
Safety Checks and Test Starts
Before firing up the freshly swapped engine, ensure safety steps complete to prevent damage or injury:
- Confirm no tools or hardware left loosely inside
- Review all mounting bolts tightened to proper torque
- Double check the kill switch and throttle function normally
- Ensure the fuel valve stays closed initially
- No leaks around the carburetor or fuel lines
- Oil level reads full on the dipstick
With checks passed, briskly spin the mill manually to confirm free rotation sans binding. Now set the choke, switch on, and give the starter cord a hearty pull!
Tuning Carburetor and Re-Torquing
Expect a lopey, unstable idle accompanied by sputtering or surging early on. As the engine settles in, adjustments commence:
- Slowly dial in the carburetor’s throttle stop for a smooth idle
- Listen for any air leaks causing vacuum hisses
- Allow the engine to fully warm up before riding
- Post-break-in, re-torque key fasteners like mounts
Patience pays here – don’t leap straight to the test ride before tuning fully dialed.
Short Initial Test Rides
With all seeming stable, it’s time to finally ride behind the newfound power! But exercise restraint:
- Just brief test laps around the driveway initially
- Focus on listening for odd noises indicating issues
- Feel for appropriate engine responsiveness
- Check for odd handling traits signaling misalignment
Zero race course daring just yet – restraint allows identifying problems beforehand.
Troubleshooting Early Issues
The maiden voyages often reveal some bugs requiring attention:
- Backfiring through the carb signals timing or jetting problems
- An unreliable, jagged idle continues pointing to carburetor tuning needs
- Overheating radiating intense heat may indicate insufficient oil levels or exhaust restrictions
Address any gremlins now before sending it wide open. And congratulate yourself for skillful problem diagnosis!
Customization and Performance Modifications after the engine swap
Gearing Changes for Speed or Torque
Once comfortably operating, the first popular upgrades involve rear cog swaps tailoring powerband:
- Smaller sprockets raise torque for wheelies but lower top speed
- Larger rear sprockets do the inverse if chasing velocity
- A torque converter acts like an automatic gearbox for improved acceleration
Bolt-on gearing changes only require a chain adjustment.
Bolstering Handling and Suspension
With substantially greater speeds possible after the engine upgrade, handling upgrades become necessary:
- Stiffer front fork springs halt diving under braking
- Thicker anti-sway bar kits bolster cornering stability
- Stickier racing tires provide radically improved grip
Protect yourself from the elevated pace through serious suspension upgrades.
Breathing Mods via Intake and Exhaust
The engine inevitably wheezes under performance mods without help inhaling and exhaling:
- Aftermarket exhaust systems significantly boost top-end pull
- High-flow air filters feed the engine more efficiently
- Velocity stacks, intake tubes, etc. optimize tract volumetric efficiency
Uncork the engine through science-backed airway improvements.
Internal Engine Tuning Upgrades
Those seeking every last pony tap into factory-limited output reserves via:
- Head milling to raise compression ratios
- More radical camshaft lobe profiles
- Port and polish jobs smoothing intake/exhaust flow
- Lightweight forged internal components shaving friction
With great risk comes great reward – race responsibly!
Last Words
Upgrading to a bigger, brawnier engine unlocks mini bike performance potential far beyond factory limits. The swap journey brings mechanical learning while the finished product delivers vastly expanded speed and capabilities.
Despite the challenges inherent to any complex modification, the following core benefits emerge:
- Learning technical skills turns beginners into capable mechanics
- Thrilling acceleration surpasses smaller motors
- Top speed ceilings raise by over 50% easily
- Customization doors open for future tweaking
The swap unshackles the mini bike from its slow origins, rocketing it into pneumatic tire territory.
Transformational Leaps in Speed and Power
While the undertaking requires patience, the exponentially greater performance speaks for itself. Engineers specially designed bigger engines for output numbers that small mills can’t match.
Ready yourself for the abrupt explosion of low-end torque threatening to lift the front wheel at every green light. Prepare for a top speed showing numbers simply unfeasible previously.
The mini bike you THOUGHT you knew transforms into a thrill ride.
Swapping Starts Your Customization Journey
An engine upgrade marks the first milestone, not the end goal. With a powerful platform now established, the fun truly starts.
The swap establishes a baseline that you can build upon through gearing changes, suspension mods, or more advanced engine tuning. Or leave it be, because even stocking the engine transformed the bike plenty already!