Detailed Guide on Mini Bike Maintenance!
With mini bikes surging in popularity, many thrilled new owners soon wonder – do these small but mighty machines demand excessive maintenance? The simple answer is yes, routine care is required. However most upkeep is straightforward for an average owner new to motorcycle wrenching.
By sticking to prescribed intervals from the manufacturer and getting cozy with essential adjustments like tuning brakes, lubricating chains, and changing liquids and filters, keeping a mini bike well-maintained isn’t too tall an order. In this guide, we’ll equip you to handle fundamental tasks confidently while also answering how mini bike maintenance stacks up against bigger bikes.
Key Takeaways
- Stick religiously to oil change, tune-up and filter replacement intervals listed in owner’s manual
- Frequently examine brake pads, chains, sprockets for wearing down and replace promptly
- Clean air filters before each ride and swap out entirely when excessively dirty
- Lubricate drive chains before every use to prevent internal wear over time
- Address any small issues spotted during pre-ride checks before problems magnify
- Learn fundamental DIY tasks like adjustments and fluid changes to avoid shop bills
Follow the Mini Bike’s Manual
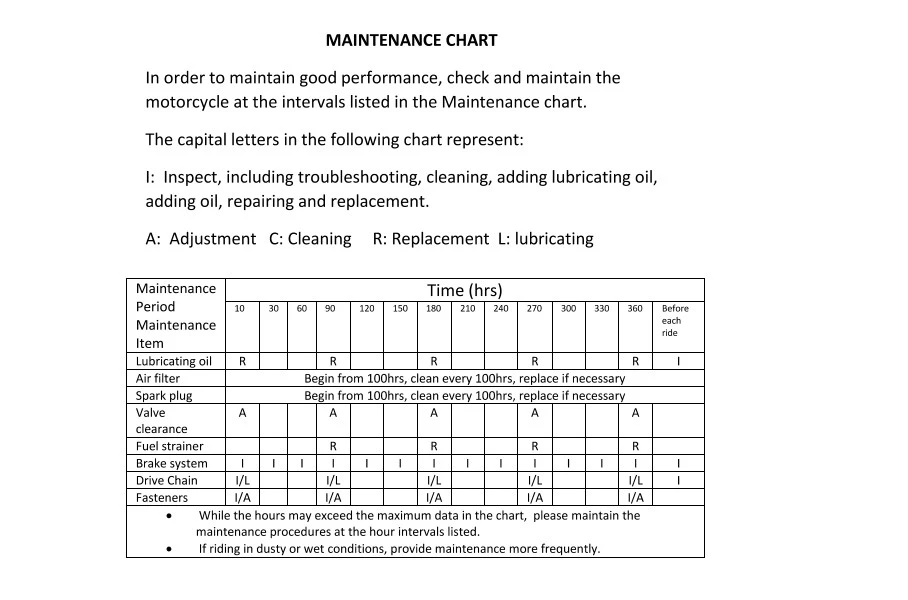
The bike’s manual gives key tips from its makers. So it’s the best starting point for maintenance. Inside you’ll see when to do tasks like:
- Change oil and filters
- Replace air filters
- Tune-up spark plugs
- Adjust brakes, chains, clutches
For a frequently ridden mini bike, technician Smith recommends, “oil and filter changes should happen every 40-60 hours of ride time or at least 2-3 times per year minimum. Air and fuel filters may need cleaning or changing every 20-30 hours.” While most manuals specify 10-15 hours between oil swaps, Smith advises more frequent changes for hard-ridden recreational bikes.
He says spark plugs can last 500+ hours, but inspect occasionally for fouling or wear. Following shortened intervals on fluids, filters and inspections prevents damage on machines seeing regular use.
Also build a habit of quick checks before every ride. Scan for problems like:
- Low tire pressure
- Damaged chains/sprockets
- Loose parts
- Leaks or unusual wear
- Odd sounds
- Weak acceleration/braking
Fixing small issues quickly avoids later breakdowns or falls. Blending scheduled upkeep with vigilance wins years of fun from a well-kept mini bike.
Doing Basic Maintenance Yourself
While complex engine rebuilds are professional territory, much of a mini bike’s care can be handled right at home. With some tools, patience and an owner’s manual, you can master key tasks like:
Oil and Filter Changes
Fresh oil keeps engines lubricated as pistons rapidly move. I swap mine when dark or at 10-15 hour marks. Changing the filter also captures gunk. The jobs are simpler than they seem.
Air Filter Care
Dirty filters reduce performance. I check them before each ride and clean with air blasts when caked. Aftermarkets may need gentle soap and water. Replace if bent or shedding apart.
Spark Plug Replacement
The plugs’ spark ignites combustion. Using a wrench, I remove them yearly to check for corroding or buildup. Re-gapping or replacing brings back pep.
Chain Lubrication
I thoroughly clean chains before applying motorcycle lube. This prevents internal wear and rust for butter-smooth rides. Wax lubes are an intriguing option too.
Adjusting Brakes, Clutch and Throttle
With practice, one can self-service cable tensioning, lever clears, bleeding procedures, and more. I learned from trial-and-error, being gentle with spring systems. The motivation? Not needing shops for every tweak.
Tire Pressure and Tread
Before each ride, I confirm tires meet psi specs with a gauge for the model, usually 10 psi. I also scout for bald spots and abnormal wear. Proper inflation and tread grip terrain.
Performance Mods and Upgrades
While routine adjustments keep mini bikes running right, owners can unleash even more power and capability through customized mods. But best practices still apply when tinkering under the hood, including:
Engine Modifications
I start by safely removing governors to allow more RPMs. Then come torque converters providing variable gear ratios, bigger carburetor jets for more fuel, and exhaust headers increasing airflow. Recently, I modified valve springs to allow engines to rev higher before float occurs. It’s tempting to push limits, but smart to upgrade internals first.
Suspension and Wheels
A big bore shock kit made my ride far more stable through rough trails and higher speeds. I also installed wider aftermarket wheels wrapped in stickier rubber allowing me to corner harder and accelerate quicker with enhanced grip. Always research correct tire sizes to avoid rubbing. And confirm components fasten securely.
Installing Upgrades
When swapping parts, having service manuals handy is mandatory. I photographed layouts before removing components to ease reassembly. Following torque specs prevents stripped bolts and leaks. And don’t forget to reconnect all sensors and electronics like safety kill switches when done. Rushing installation risks wasting money if ignoring details.
For riders committed long term, technician Smith strongly advises sticking religiously to factory maintenance intervals. He says, “Clean thoroughly after every long or muddy ride” and “Wax the frame twice a year to prevent corrosion.” Smith also recommends replacing worn components early before failure – brakes, chains, sprockets, etc. Rebuilding carburetors and shocks every 2-3 years maintains peak performance. And storing bikes indoors or covered avoids damage from the elements. Keeping meticulous maintenance logs over decades highlights upcoming service needs for maximum lifespan.
While some owners pursue adrenaline-pumping customizations, Smith endorses responsibly prioritizing reliability and safety first for longevity. Approach modifications only after mastering maintenance for lasting enjoyment.
Troubleshooting Breakdowns
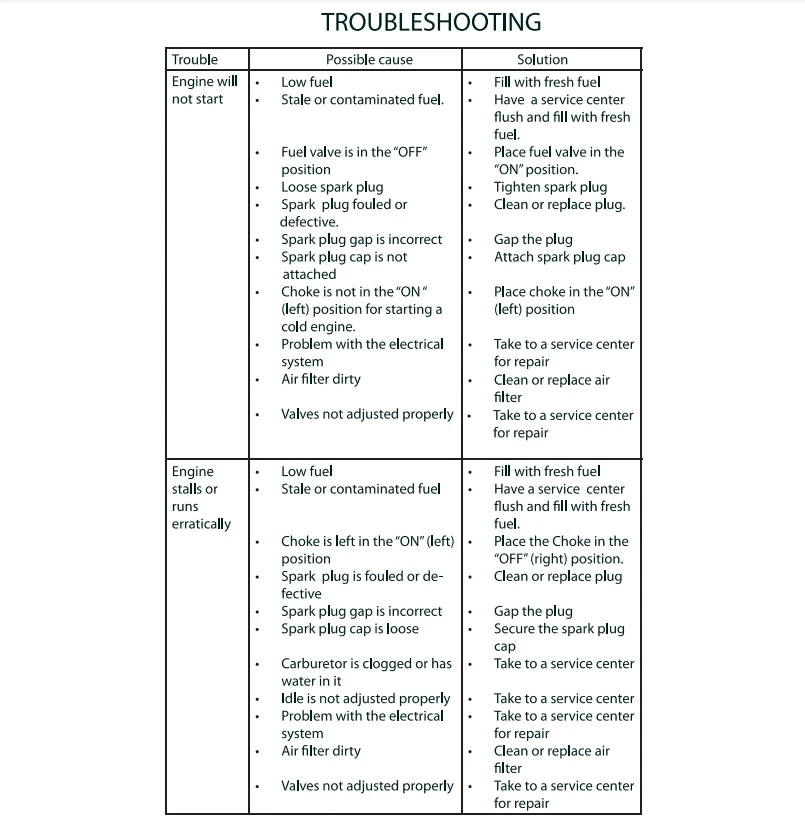
When diagnosing mechanical problems, technician Adam Smith’s (from Street Rider of Reno) top troubleshooting tips are, “Start simple before getting into complex issues – check basics like fuel supply, battery charge, loose bolts” and “Use the process of elimination to narrow down root cause – test parts systematically.”
He advises owners to first monitor all sensors and gauges during test drives. If engine issues arise, inspect filters, fluids and spark plugs to ensure proper air/fuel mix reaching the carburetor. For brake problems, check brake linings, master cylinders and calliper seals.
Even well-maintained mini bikes experience occasional issues. But owners can diagnose and remedy problems themselves with Smith’s advice. Determine if electrical, drivetrain or engine based. Then systematically eliminate potential causes, starting simple with basic checks before complex components.
Monitor sensor readouts for clues during test rides. For engine troubles, ensure proper air/fuel mix by inspecting filters, fluids and spark plugs. And for brake problems, check system parts like linings, cylinders and seals. Smith’s process streamlines troubleshooting for confident diagnosis.
Engine Problems
Sudden loud knocks or smoking exhausts often trace to fuel delivery failures. I confirm filters aren’t clogged, carbs are clean, and fuel is flowing before the ignition occurs. Getting no spark? Check kill switches, spark plug connections, and kick starter contacts before assuming coil or stator demise.
Brake, Chain and Clutch Failures
If a clutch lever feels like nothing happens, verify the cable tension wasn’t thrown out of whack. Realigning my rear brake calliper solved a recent rubbing. And I determine if drivetrain slack is due to tensioners, stretched chains, or gear damages. Process of elimination paired with inspection pinpoints most causes.
Electrical Faults
Corrosion is wiring’s enemy. So I carefully follow cables ensuring connections are tight, checking for frays or cracks. A battery not holding charge can also stop ignition sequence. And I never assume the obvious parts are the culprits without verification – troubleshoot sensors systematically.
Don’t fret over every hiccup, but acting quickly when problems arise gives the best shot at simple fixes. Identify the system affected, gather clues through checks, tap online forums for common failures, and address issues before root causes worsen. And know when bigger repairs mean a shop visit.
Do Mini Bikes Need Lots of Upkeep?
Considering their exposure to harsh conditions, how does preventative maintenance stack up between mini bikes versus heavy riding full-size motorcycles?
Cost of Ownership
- Mini bike parts like oil, filters, tires, are inexpensive – usually under $15 each
- Replacement components like brake pads, chains, sprockets run $50-150
- Bigger fixes like failed engines can reach $300-800
- But negligence multiplies costs – proper care prevents big repairs
Maintenance Intervals
- Mini bikes – Oil changes each 10-20 hours
- Mini bikes – Air filters inspected pre-ride, changed 30-40 hours
- Motorcycles – Oil around 100-200 hour marks
- Motorcycles – Air filter swaps every 40-60 hours
So mini bikes need more frequent fluid and filter servicing. But smaller part sizes keep those regular costs low.
Repair Feasibility
- Most mini bike tasks very DIY friendly – oil, brake, chain adjustments, electrical
- Complex motor rebuilds still professional territory
- Motorcycles require more skill/tools for equivalent tasks
- Mini mechanics more reachable for average owners
In summary, mini bikes are more maintenance intensive based on service timeframes, but cheaper to repair and within reach of home mechanics. So while requiring diligence, overall upkeep is reasonable.
Keeping Mini Bikes Ready to Ride
What at first seems like a toy vehicle needing only gas and go actually requires regular upkeep for maximum enjoyment. Following the manual’s guidance on fluid changes, tune-ups, lubrication and inspection prevents issues. Addressing problems spotted through checks also prevents big repairs later.
Think of maintenance as enhancing the thrill of mini bike ownership. Start simple by changing oils. Work up towards brakes and clutch tuning over time. View the gradual skills growth as a rewarding process rather than a chore. With some mechanical confidence, keep your ride reliable for years through fundamental, do-it-yourself tasks.
While needing more frequent periodic maintenance than big motorcycles, mini bike care is straightforward with basic tools, patience and manuals. Now filled with tips on proper upkeep, here’s to conquering dirt trails ahead!