How to Build a Mini Bike Frame Kit With Suspension?
Start with a reinforced frame having suspension mounts. Bolt on compatible shocks and fabricate a swingarm for pivoting rear wheel travel. Carefully tune suspension spring rates, compression and rebound for ideal responsiveness based on rider weight and usage, while testing and troubleshooting issues.
Custom mini bikes are very popular. More people build them at home with custom parts. They use small engines and frames. Mini bikes give thrilling rides at slower speeds.
Adding a suspension is a common upgrade. Suspension means shocks and swingarms. They absorb bumps and impacts. This makes the ride smooth and controlled.
A good suspension setup also improves handling. The mini bike can turn better and is easier to steer. Traction is better so it is faster with good grip. Suspended mini bikes have better performance.
This article shares the full process to add suspension:
- Picking frame kits and parts
- Front and rear suspension install
- Tuning the suspension travel and height
- Making a reinforced frame
- Steering changes if needed
- Fixes for issues
- Custom add-ons to improve style and performance
- Legality and safety info
- Maintenance steps
Adding suspension makes mini bikes much more fun!
Key Takeaways
- Custom mini bikes are very popular for recreational riding and easy DIY builds
- Adding suspension (shocks and swingarms) makes the ride smoother, improves handling/traction, and enhances performance
- Carefully choose a frame with suspension mounts and research compatible components
- Front suspension includes shocks, fork tubes, triple trees bolted to frame
- Rear suspension uses a swingarm pivot system and mounted shock absorbers
- Tune suspension by setting proper sag, spring rates, compression/rebound damping based on rider weight
- Strategically brace frame with triangulated supports to prevent fatigue cracks from launches
- Adjust steering geometry factors like rake, trail, and center of gravity
- Troubleshoot issues like bottoming out or bouncing by tweaking preload, travel, damper settings
- Customize performance, ergonomics, and aesthetics with upgraded components and accessories
- Ensure legal compliance with registration laws, licensing, required safety gear
- Maintain through scheduled component replacement, frequent suspension inspection and care
Choosing Frame and Components
The frame is the foundation of any mini bike build. For best suspension performance, choose a frame kit made specifically for suspension add-ons. As expert Adam Smith from Street Rider of Reno, with 20 years experience advises explained, “When building a mini bike frame for suspension, the materials you choose need to be strong yet flexible. Based on my experience constructing dozens of custom mini bikes, steel tubing provides the best combination of durability and shock absorption.” The frame must have mounting points and bracing to support both front and rear shocks.
Some top frame recommendations are:
- RASCAL favored for its suspension readiness Black Widow frames for overall durability Lil’ Rascal good value kit option
- Mega Moto Pro strong enough for adult sizes Research frame specs to understand build style, difficulty, finished bike size, engine compatibility, and any model-specific notes.
Beyond the basic frame, research compatible components like:
- Shocks – Look for 1”, 2”, or more of travel depending on terrain. Piggyback and remote reservoir coils handle jumps well.
- Springs – Range from 400-800 lbs depending on total rider weight. Heavier or aggressive riders need firmer springs.
- Swingarms – Choose swingarm pivot style compatible with frame. Consider dual shocks and sizing for adequate tire clearance.
- Linkages – Important for tuning leverage ratio between swingarm movement and wheel travel.

Sourcing quality aftermarket mini bike parts yields superior performance and durability over basic OEM equipment. Trusted brands include parts from Manco, Mikuni, and TrailMaster.
For full customization, fabricating one-off components like swingarms takes advanced welding and fabrication skills.
Front Suspension Installation
Adding front suspension is fun! Follow these steps:
Materials Needed:
- Front shocks, fork tubes, triple tree kit
- Wrenches to attach parts
- Spring rate calculator
Step 1: Bolt the triple trees to the frame stem.
- Triple trees hold the shocks and fork tubes
- Use manufacturer torque for bolts
- Check parts align straight
Step 2: Slide the fork tubes through.
- Extends from triple tree through wheel hub
- Add bushings inside to reduce friction
Step 3: Mount the shock absorbers.
- Attaches to bottom of tubes and triple tree
- Adjust to correct height settings
Step 4: Set preload tension with collars.
- Light riders: 1/2 inch gap
- Heavy riders: 1/4 inch gap
- When seated on bike with full gear
Step 5: Tune suspension feel.
- Soften rebound so front not too bouncy
- Add compression damping for control in turns
The key is setting sag and spring rate right. Sag is how much the shocks compress under rider weight when seated. Use a zip tie on the tube to monitor sag depression.
Use online spring rate calculators to match your weight and riding style. Heavier or aggressive riders need 500-800 lb/in springs. Lighter joyride use can use 400-600 lbs.
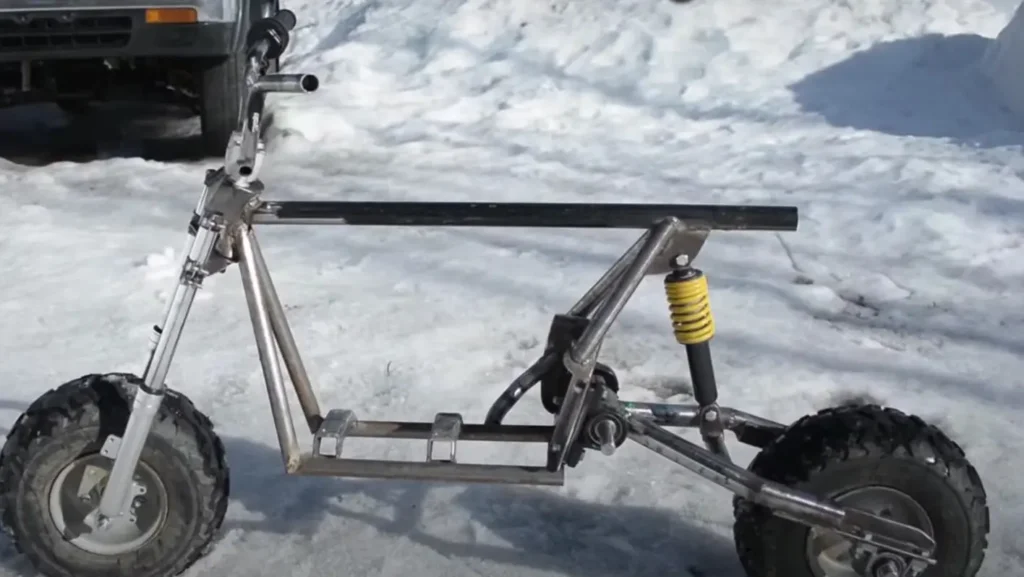
Rear Suspension Assembly
The rear swingarm and shocks are next. Custom swingarms improve the rear suspension travel and strength.
Fabricating a Swingarm
Supplies Needed:
- 3/4 inch steel tubing
- Diameter to allow for tire clearance
- Shock and pivot mounts
- Welder and grinding tools
Step 1: Measure and cut tubing sections.
- Reference bike’s wheelbase measurements
- Weld in gussets for extra strength
Step 2: Add shock mounting plates.
- Plates weld onto frame and swingarm
- Allows bolt-on shock attachment
Step 3: Install pivot and bearings.
- Allow swingarm to pivot as wheel goes over bumps
- Use heavy duty pivot axle and bearings
Shock Mounting Considerations
- Angle rear shock 30-35 degrees for best control
- Too flat reduces swingarm movement
- Too steep causes kicking when hitting jumps
Give 1.5 to 2 inches clearance around the rear tire. Carefully check clearance when rear suspension is fully compressed.
Suspension Settings
- Set sag to 25-30% of total shock travel
- More rebound damping for smooth fast descents
- Less low-speed compression for comfort
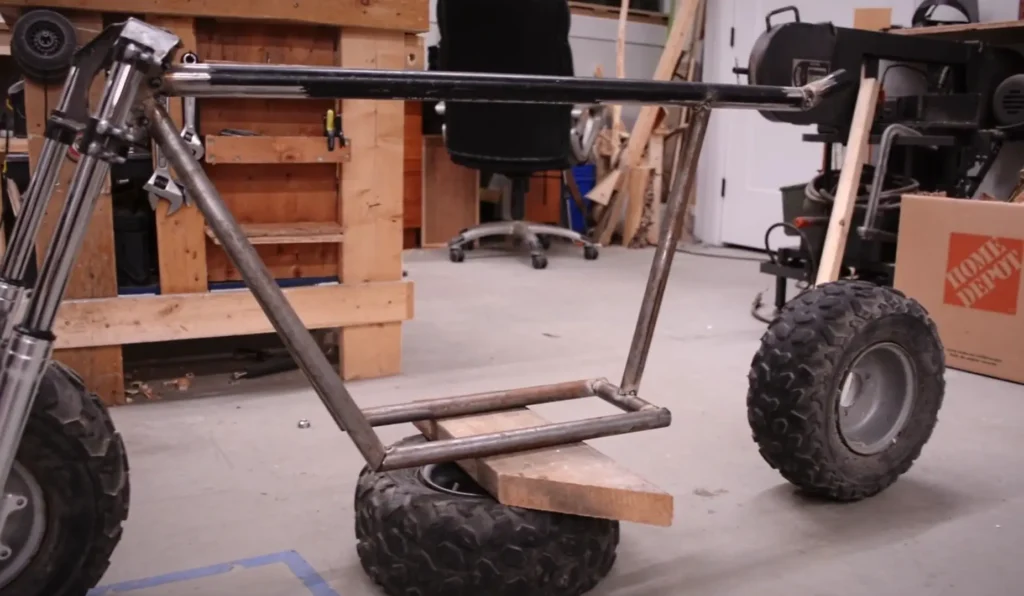
Frame Reinforcement and Bracing
When adding suspension, extra frame braces add strength. Triangulated braces prevent cracking under the forces of jumps and rough landings.
Bracing Materials:
- 1 inch steel tubing for braces
- Triangles better than single braces
- Grade 8 hardware for durability
Strategic Brace Placement
Front:
- Triangle connect front lower triple tree to frame stem
- Minimizes flex when landing nose-heavy
Rear:
- Create triangle between the seat, rear fender, and rear swingarm pivot
- Prevents fatigue cracks along the seat and fender mounts
For the swingarm pivot:
- Brace the pivot plates back to rear frame
- Adds shear and bending strength
With suspension pushing the limits of the frame, strategic triangulation maintains chassis rigidity. Carefully fabricated braces can match the bike’s aesthetics while guaranteeing those big-air launches remain stable and controlled.
Steering Adjustments
Once the frame and suspension are dialed, align the steering geometry. Rake, trail, and center of gravity are key factors affecting handling.
Rake – The angle of the front forks. More rake provides easier turning but less stability.
Trail – The distance the front wheel ground contact trails behind the steering axis. More trail improves high speed stability.
In my experience, beginning mini bike builders should stick to the stock geometry specs. But as your experience grows, small adjustments can customize the steering.
Lengthening the wheelbase slightly can add high speed stability. Just ensure adequate frame clearance for full suspension travel.
Extending the swingarm is another advanced customization. But it requires matching the front geometry and brace placements to avoid unwanted headshake.
Testing and Tuning Tips
Start tuning runs at low speeds close to home. Focus on tuning stability first before chasing sharp handling with advanced mods.
Gradually work up to full speed runs on your typical terrains. For optimal control, fine tune rake, trail, and ride height increments at just 1/8” to 1/4” per adjustment.
Be conservative and make single parameter changes at once to properly track improvements. Keep detailed notes on quantitative adjustments and qualitative test ride feedback.
Troubleshooting Suspension
Suspension requires regular tuning and occasional troubleshooting as components settle in. Bottoming out and bouncing are two common problems.
Bottoming Out
This occurs when the suspension travel becomes fully compressed by a bump or landing. Tuning steps to reduce bottom outs:
- Increase spring preload slightly to reduce travel
- Add a plastic travel limiting spacer
- Upgrade to higher lb/in rated steel springs
Bouncing
Excessive rebound damping causes the suspension to bounce back too quickly. To stabilize:
- Back off the rebound damping a few clicks
- Switch to thicker oil weight in the dampers
- Install heavier rated springs
Resetting Sag
Over time, shock oil and springs settle-in requiring sag resets.
- Measure updated sag sitting stationary
- Adjust preload collars to retune sag to 25-30%
By methodically adjusting one variable at a time, you can dial-in the right suspension reactivity. Test carefully to ensure fixes alleviate bouncing or topping out without compromising bump absorption.
Customization Options
Beyond performance, custom touches make your build uniquely yours. Cosmetic upgrades allow personalized style. Ergonomic add-ons optimize comfort and control. And next-level components take performance to expert heights.
Cosmetic Customizations
- Color match new triple trees, rims, and components
- Contrast colored springs, piggybacks, and hardware
- Paint, wrap or airbrush the rims , frame, bodywork
- Add graphics and decals for eye-catching details
Ergonomic Accessories
- Aftermarket offset triple tree clamps for improved ergonomics
- Bar risers, advanced controls (e.g. hydraulic clutches)
- Custom one-off seat fabricated to your exact proportions
Advance Performance Upgrades
- Triple rate springs for bottom out resistance
- Titanium or chromoly suspension components
- Dual piggyback reservoirs for extreme jumps
- Send shocks for professional valving service
The options for upgrades are endless when building a custom mini bike. Aesthetic and functional add-ons let you chase performance goals while creating your dream machine
Legal Requirements and Safety
Before hitting the streets and trails, consider registration needs and riding gear requirements to stay safe and legal.
Registration and Titling
Most states require registration and titles for any engine displacement 49cc and above. Certain models may be grandfathered in or qualify for off-highway only documentation. Research specific equipment definitions and exemptions for your state.
Ride legal by knowing license endorsements, license plate needs, and required safety features based on your bike’s engine size and top speed capabilities. Consider insuring your custom build to protect your investment.
Safety Gear
The correct riding gear combats injury in any get-off situation.
Always wear safety equipment including:
- DOT certified full-face helmets
- Goggles to prevent debris entering eyes
- Knee, elbow, and shoulder protection
- Full finger motorcycle gloves
- Over the ankle boots with traction
Riding Requirements
Most areas prohibit mini bike use on highways and sidewalks. Ride responsibly on private closed courses and approved OHV areas. Transport mini bikes safely.
Ensure you have the legally required supervision when allowing child riders. Check your state’s age restrictions. Proper protective gear applies for both adults and kids.
Maintenance Best Practices
Routine maintenance keeps your custom suspended mini bike operating safely and reliably long-term. Follow scheduled component replacement and conduct regular suspension inspections.
Regular Replacement Schedule
- Oil changes every 5 moto hours, check levels pre-ride
- New air filters every 10 moto hours
- Coolant every 2 years
- Brake pads when <30% minimum thickness
- Tires based on tread wear with no cracks
Suspension Care
Before each ride check:
- Shock seals and welds for leaks/cracks
- Bushings and bearings for smooth tight movement
- Fastener tightness on all suspension mounts
- Fork tubes and spindles for dents and abnormalities
Every 20-30 moto hours lubricate suspension pivots and inspect inner components. Replace dust seals or o-rings if compromised preventing grit damaging shaft surface finish.
Consider a full shop fork and shock oil change and fluid dynamics service every 100 moto hours.