How to Adjust Float on Doodle Mini Bike?
To tune the carburetor float, remove the bowl, inspect parts, measure height with calipers, compare to manual specs, then bend metal tang to set proper level before reinstalling. Periodically checking float height keeps performance smooth.
A Perfectly Tuned Carburetor Starts With Properly Adjusting Float Level
Has your doodle mini bike been struggling with symptoms like stalling, flooding, or poor fuel economy? The likely culprit could be an out-of-adjustment float in your bike’s carburetor.
This vital component controls the gas level in the fuel bowl, impacting performance. An improper float height can cause it to get stuck, resulting in engine hiccups like:
- Black smoke from rich mixture
- Poor acceleration when revving throttle
- Higher than normal fuel consumption
- Difficult starts or random stalling
The good news is that finely tuning your mini bike’s carburetor float is usually a straightforward process that can restore smooth operation. This article provides step-by-step instructions and tips for DIY adjustment.

Key Takeaways
- Improperly adjusted carburetor floats can cause poor mini bike performance like stalling, flooding, and bad fuel economy
- Tuning the float height is usually an easy fix to restore smooth operation
- Safety first – use protective gear, secure the bike, have a fuel spill can ready
- Key steps: Remove the float bowl, inspect for damage, measure height, bend tang to adjust, reinstall, test performance
- If issues persist, check fuel lines, overflow pipes, or rebuild the carburetor
- Periodically inspecting the carburetor can prevent small problems from becoming big ones
- Following factory service manual specs and these tips will keep a mini bike running great
Safety First
Working on a mini bike with gas needs care. Before you start, do this:
- Put on gloves and eye gear
- Work in an open spot away from sparks
- Make sure the bike is cold and off
Also:
- Use a stand to hold the bike still
- Have a gas can ready for fuel spills
- Gather tools like wrenches and rulers
Staying safe matters most when fixing your bike’s carburetor.
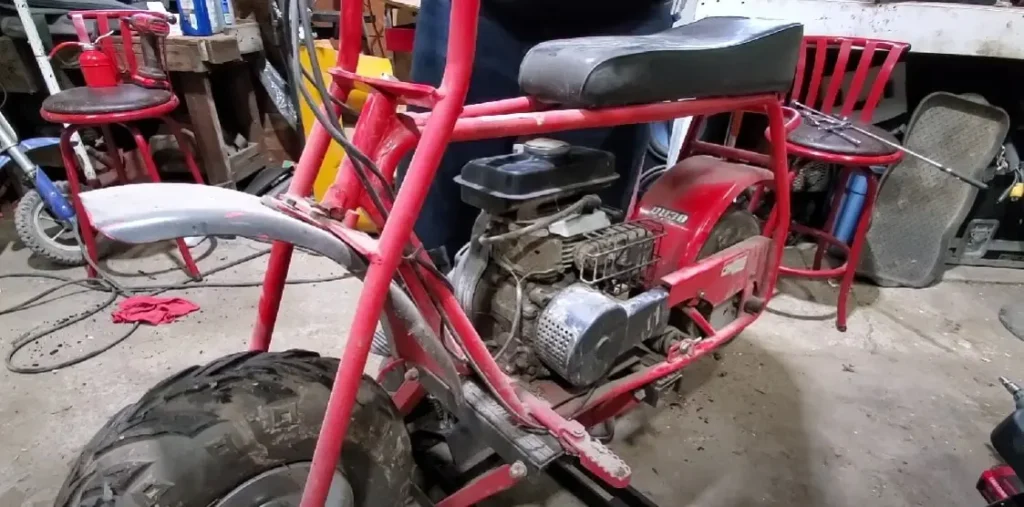
Fixing the Float in a Few Easy Steps
Adjusting the carburetor float is basic. Follow along with the photos to:
Remove It
First, take off the float bowl. Then lift out the float and needle valve so you can check them.
Inspect It
Look at the float bowl and pilot jet for dirt or damage. Check if the float moves easily.
Measure It
Use calipers to measure float height. Check your bike guide for the right specs to match.
Adjust It
To raise or lower float level, gently bend the metal tang piece.
Reinstall It
Put the float parts back how they were. Screw the bowl back in place carefully.
Start It
Turn on your bike and try adjusting fuel mixture screws if needed.
Troubleshooting Tips to Keep Your Bike Running Smooth
What if your bike still stalls or won’t start right after adjusting the carburetor float? Here are some next troubleshooting tricks:
Check the Fuel Lines
Make sure no cracks or leaks are making the gas flow weird. Tighten up loose connections.
Inspect Overflow Pipes
If they get blocked, extra gas can’t drain right from the carb bowl.
Consider Rebuilding
If the float needle is too worn out or sticky, you might need to replace carb parts.
Few Things Feel Worse Than Troubleshooting the Carb Over and Over. To Get Your Bike Back Up and Running, Pinpoint the Real Issue So Fixes Last.
Checking the entire fuel system part-by-part takes some patience. But those troubleshooting efforts keep your beloved mini bike rollin’!
Keep Your Bike Humming
Let’s review the key points:
- Adjust the float height if your bike isn’t running right. Measure and bend the metal tang to fix it.
- Sticking to what the factory manual says on carb parts like floats and fuel mix is smart.
- Check on your carb once in a while. That way, small problems won’t become big ones down the road.
Following this simple advice will keep your mini bike running great for years to come!